
Displays Dioramas
DISPLAY CABINETS
A good display cabinet can make your diecast cars, plastic model kits, and vintage toys look like a curated collection instead of random items on a shelf. The right cabinet protects your pieces from dust, adds lighting, and gives you room to build diorama scenes. You don’t need a huge budget—just a clear idea of what you want to show and how much space you have. Here are practical cabinet ideas you can adapt to almost any collection.
1. Closed Glass Cabinets – Clean and Dust-Free
Closed glass cabinets are one of the best options if you want to protect your collection.
Dust protection: Glass doors and sides keep dust off your models, so details stay visible and you spend less time cleaning.
Good visibility: Glass on multiple sides lets light in and makes it easy to view your collection from different angles.
Great for detail-heavy items: Ideal for 1:24 diecast, plastic model kits, and small vintage toys with fine paint and decals.
Look for cabinets with adjustable shelves so you can change the height to fit taller model kits, trucks, or larger display pieces.
2. Open Shelving – Flexible and Easy to Expand
Open shelves are simple, cheap, and easy to expand when your collection grows.
Easy access: You can move and rearrange models quickly without opening doors.
Good for big pieces: Works well for larger pressed steel trucks or big diorama bases that don’t fit in standard cabinets.
Budget-friendly: Basic wall shelves or bookcases can become effective displays with a bit of planning.
The trade‑off is more dust, so open shelves work best for displays you don’t mind cleaning occasionally or for tougher, less delicate pieces.
3. Wall-Mounted Cabinets – Save Floor Space
If floor space is limited, wall-mounted cabinets are a smart option.
Off the floor: Frees up room while still giving you eye-level viewing.
Great for small scales: Perfect for 1:64 diecast, small model cars, and compact diorama scenes.
Safe from bumps: Keeping displays off the floor helps protect them from accidental knocks.
Aim to mount cabinets at a comfortable height so you can see the top shelves without straining.
4. Adding Lighting to Your Display Cabinet
Lighting can transform a basic cabinet into a standout display.
LED strips or spots: Simple LED strips along the top or back of a cabinet can highlight paint, chrome, and details.
Warm vs cool light: Warm light can make vintage toys and wood shelves feel cozy; cool light can make diecast and modern models look sharp and clean.
Avoid heat: Choose LED lighting that doesn’t heat up, so it won’t warp plastic or damage paint.
Start with one cabinet or one shelf—often even a small lighting upgrade makes a big difference.
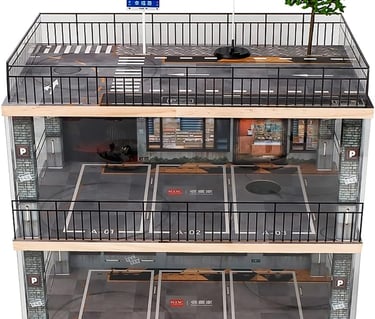
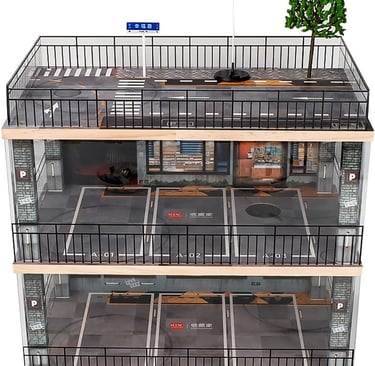
5. Using Cabinets as Diorama Cases
A display cabinet doesn’t just have to be plain shelves. You can turn each shelf into a diorama scene.
Add simple bases (roads, garage floors, dirt or grass textures) that sit on the shelf.
Use printed backdrops or photo backgrounds taped or mounted behind the models.
Place a few props (barrels, signs, trees, tools, figures) to suggest a story.
Each shelf becomes a mini “stage” inside a dust‑protected cabinet, letting you combine the best of both worlds: clean display and creative scenes.
6. Planning Your Next Cabinet Upgrade
Before buying a new cabinet, take a quick inventory of what you display most: diecast, model kits, pressed steel trucks, or mixed pieces. Decide whether your biggest issue is space, dust, or lack of impact. Then choose the upgrade that fixes that problem first—more vertical shelves, a closed glass case, or better lighting. Step by step, your room will shift from simple storage to a series of intentional displays that show off your collection at its best.
DIORAMAS
A diorama turns your shelf or cabinet into a small scene instead of just a row of models. With a simple base, a backdrop, and a few props, your diecast cars, model kits, and vintage toys suddenly look like they’re part of a real place. You don’t need advanced modeling skills or expensive materials to get started. This guide covers easy diorama ideas you can build in an evening to upgrade your displays.
1. Start With a Simple Base
The base is the “ground” your diorama sits on.
Use foam board, thin wood, or sturdy cardboard cut to fit your shelf or cabinet.
Paint it a single, simple surface: grey for a road, brown for dirt, green for grass, or concrete for a garage floor.
Keep it flat and smooth so your models sit level and don’t tip.
For a quick upgrade, you can add a painted center line or parking lines on a “road” base using tape and white/yellow paint or a paint pen.
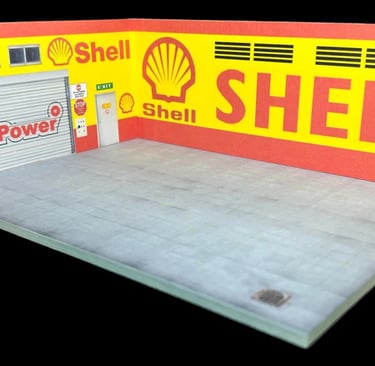
2. Add a Printed or Simple Backdrop
A backdrop finishes the scene and hides the wall behind your models.
Print a photo background: city street, racetrack, workshop, or generic buildings.
Use plain colors or simple gradients if you want a clean, modern look.
Mount the backdrop on card or foam board and place it behind the base in your shelf or cabinet.
Even a basic printed image makes a big difference and helps your collection look more like a display and less like storage.
3. Use Small, Easy Props
Props bring life to a diorama without much work.
For car scenes: cones, barrels, tools, tires, signs, fuel pumps, simple figures.
For workshop/garage scenes: toolboxes, shelves, jacks, ramps, oil cans.
For outdoor scenes: trees, grass tufts, fences, rocks, and simple signs.
You can buy ready‑made props, repurpose items from other toys, or build quick pieces from card, plastic scraps, or leftover model parts. Keep props small so they don’t distract from the main models.
4. Keep Each Shelf to One Simple Theme
The easiest way to make dioramas look good is to give each shelf a single, clear theme.
Examples:
A street scene with parked cars along a curb.
A garage or workshop with a few cars “being worked on.”
A race grid or pit lane for motorsport models.
A yard or lot for trucks, construction vehicles, or pressed steel toys.
You don’t need complex scenery—just enough hints (base, backdrop, props) so people immediately see what the setting is.
5. Make Dioramas Removable
If your diorama sits in a display cabinet, it helps if the whole scene is removable.
Build your base and backdrop as a single tray or panel that slides in and out of the shelf.
Glue your backdrop to the base or a separate board that stands firmly behind it.
Attach small props lightly so you can move or replace them without damage.
This lets you change themes over time—swap from city street to garage scene, or from race day to parking lot—without rebuilding your entire cabinet.
6. Start Small and Upgrade Slowly
You don’t need to build a full, detailed diorama in one go.
First evening: cut and paint a base to fit your shelf or cabinet.
Second evening: add a backdrop.
Third evening: place a few props and adjust positions until the scene feels right.
Small, steady upgrades often look better than one rushed, complicated project. Over time, your shelves will turn into a series of clean, themed dioramas that make your display cabinets and collections look far more intentional and interesting.
https://www.diecastkars.com
